How to Diagnose and Replace Your Power Window Motor Effectively
When it comes to the comfort and convenience of modern vehicles, power windows have become an indispensable feature for many drivers. However, like any electrical component, the power window motor can encounter issues over time. Recognizing the signs of a failing motor is crucial for maintaining the functionality of your vehicle's windows, as it can directly impact your driving experience and safety. This guide aims to equip you with the knowledge needed to diagnose your power window motor effectively.
Understanding the performance and potential problems of your power window motor is the first step toward a successful repair or replacement. Common symptoms often include slow or unresponsive windows, unusual noises during operation, or intermittent functionality, indicating that the motor may need attention. By learning how to identify these warning signs early, you can save time and money on repairs while ensuring that your vehicle remains a comfortable space.
Once you've diagnosed the issue, replacing the power window motor is a task that can often be tackled by DIY enthusiasts with the right tools and guidance. This article will walk you through the steps necessary for a proper diagnosis and replacement, empowering you to restore the efficiency of your power windows and enhance your driving experience. Whether you're a seasoned mechanic or a novice looking to take on a new challenge, mastering this task can provide both satisfaction and a sense of accomplishment.
Understanding Power Window Motors and Their Functionality
Power window motors are essential components in modern vehicles, providing convenience and enhanced accessibility for passengers. These motors function by converting electrical energy into mechanical energy, allowing the windows to open and close with the push of a button. Typically, there are two types of power window motors: DC motors and gear motors. According to a recent industry report, the global automotive power window market is projected to grow significantly, with an estimated compound annual growth rate (CAGR) of over 5% from 2023 to 2028. This growth can be attributed to increasing consumer demand for advanced vehicle functionalities and safety features.
Understanding the functionality of power window motors is crucial for effective diagnosis and replacement. These motors operate in conjunction with a series of components including window regulators, switches, and wiring harnesses. Common issues arise when electrical connections become loose, motors wear out due to fatigue, or mechanical parts jam. A study by the Automotive Component Manufacturers Association indicates that approximately 20% of window malfunctions are due to faulty wiring rather than defects within the motor itself. Therefore, thorough inspections of the entire power window system are essential before concluding that the motor needs replacement. By gaining insights into how these motors work, vehicle owners can make informed decisions, potentially leading to cost savings and improved maintenance.
How to Diagnose and Replace Your Power Window Motor Effectively
| Diagnosis Step |
Description |
Tools Required |
Estimated Time |
| Check Power Supply |
Verify if the window switch has power when operated. |
Multimeter |
15 mins |
| Inspect Wiring |
Look for damaged or loose wiring connections. |
Wire Strippers, Electrical Tape |
30 mins |
| Test the Switch |
Check if the window switch is functioning properly. |
Multimeter |
20 mins |
| Remove Door Panel |
Take off the door panel to access the motor. |
Screwdriver, Trim Removal Tool |
30 mins |
| Replace the Motor |
Install the new power window motor. |
Socket Set, Basic Hand Tools |
45 mins |
| Reassemble and Test |
Put the door panel back and test the window operation. |
Screwdriver |
20 mins |
Common Symptoms of a Failing Power Window Motor
When dealing with a faulty power window motor, recognizing the common symptoms can save you time and effort. One of the most noticeable indicators is a weak or inconsistent window movement. If the window struggles to go up or down, or if it stops partway, this may suggest that the motor is losing power or beginning to fail. Additionally, you might hear unusual grinding or humming noises when attempting to operate the window, signaling that internal components may be worn or damaged.
Another symptom to watch for is the presence of electrical issues. If you find that the window operates intermittently—working sometimes but not others—this could indicate a problem with the motor's electrical connections or the motor itself. In some cases, you might notice that other power features in the vehicle are affected, hinting at a greater electrical issue, but often the power window motor itself is at fault. Recognizing these signs early allows for timely diagnosis and replacement, ensuring your windows operate smoothly and safely.
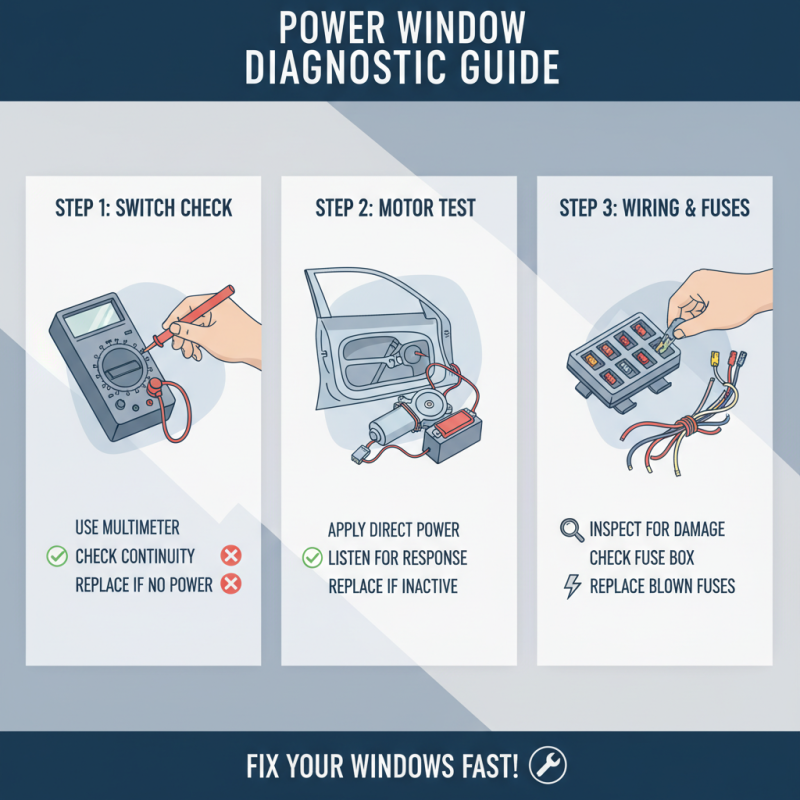
Step-by-Step Guide to Diagnosing Power Window Issues
When faced with power window issues, diagnosing the problem effectively is essential. Begin by examining the basic components of the window system. Check the power window switch for continuity using a multimeter; if it fails to conduct electricity, it may be defective. Next, inspect the window motor itself by applying direct power to it. If the motor does not respond, it's likely that it has failed. Additionally, examine the wiring and fuses related to the window system for any signs of damage or blown fuses, as these can also impede functionality.
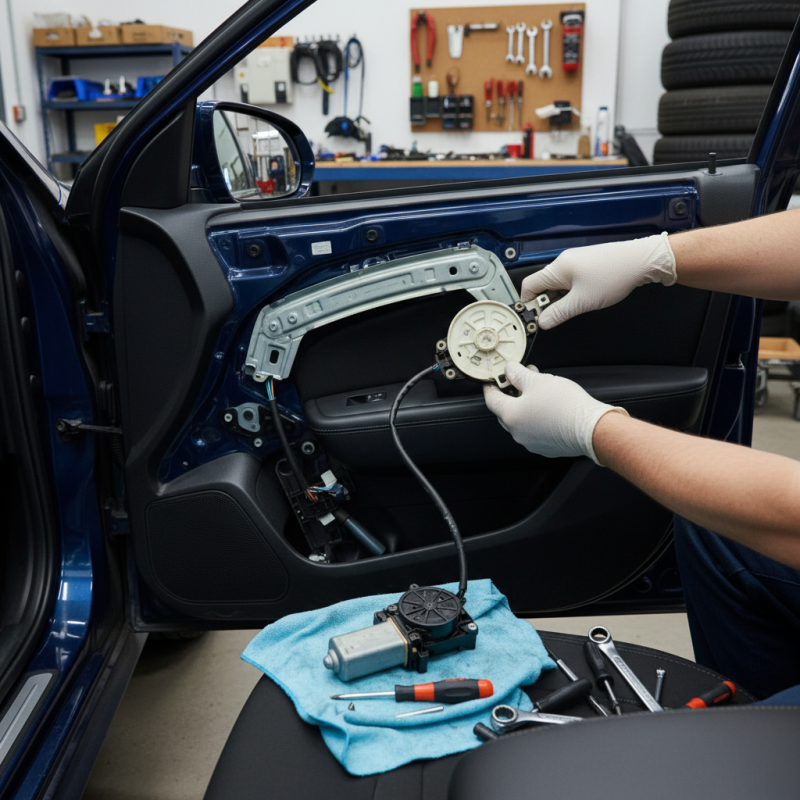
Once you’ve confirmed that the window motor is the problem, you can move on to the replacement process. Disconnect the battery to ensure safety while working on the electrical components. Remove the door panel by unscrewing any fasteners and gently prying it away to avoid breaking clips. After gaining access, detach the old motor from its housing, being careful to note any wiring connections for the installation of the new motor. Secure the new motor in place, reconnect the wiring, and test it before reassembling the door panel. Following these steps ensures a smooth diagnosis and replacement of the power window motor, restoring your window's functionality efficiently.
Tools and Materials Needed for Motor Replacement
When replacing a power window motor, ensuring you have the right tools and materials is crucial for a successful repair. According to the Auto Repair Industry Report, nearly 30% of vehicle electrical issues stem from power window malfunctions, highlighting the importance of addressing these problems effectively. Essential tools for the job usually include a socket wrench set, screwdrivers (both flathead and Phillips), and a panel removal tool. Having an adjustable wrench handy can also facilitate adjusting any screw or bolt that may require specific torque settings. Furthermore, a multimeter will be useful for diagnosing electrical issues related to the motor itself.
In terms of materials, you will need a replacement motor specifically suited for your vehicle’s make and model, as mismatched components can lead to further issues down the line. Additionally, consider having wiring connectors and electrical tape on hand to ensure secure and durable connections. The National Automotive Technicians Education Foundation (NATEF) emphasizes that the failure rate of improperly connected electrical components can be as high as 40%, underscoring the need for precision. Finally, lubrication might be necessary for the window tracks to ensure smooth operation post-replacement. By preparing adequately with these tools and materials, you can effectively tackle the power window motor replacement task.
Power Window Motor Replacement: Tools and Materials Needed
Executing the Replacement: A Detailed Walkthrough
When it comes to replacing your power window motor, a systematic approach can make the process smooth and efficient. Begin by gathering the necessary tools: a socket set, a screwdriver, and possibly a trim removal tool. Start by disconnecting the car battery to ensure safety during the procedure. Next, remove the door panel, which usually involves unscrewing various screws and gently prying off clips. Be cautious not to damage the panel as you work your way around it.
Once the door panel is removed, locate the power window motor. Disconnect the wiring harness and remove the screws or bolts securing the motor in place. Now, take the new motor and carefully install it by reversing the removal steps. Ensure the wiring is secured and reconnect the battery before testing the functionality of the new motor.
Tips: Always refer to your specific vehicle's service manual for diagram references and detailed instructions. It’s also advisable to wear safety glasses to protect your eyes from debris while working on the door panels. Lastly, if you encounter resistance during the removal or installation of parts, take a moment to reassess and avoid using excessive force, which could cause damage.